Showing posts with label MIT. Show all posts

Wednesday, October 8, 2014

App Inventor dev tricks: reducing compilation time while doing development

I want to share a few tricks that some of us use for speeding up App Inventor when we are full on development mode. Note that most of these tricks should only be used while developing, but when you are ready to open a pull request you should skip all tricks, make a full compilation for all languages and browsers, and fully test (manually as much as you can, and always run `ant tests`).

The first thing you should check (at least from time to time) is the listing of available targets in the main ant script. Here is how:

Tip 1: check out all targets available with `ant -p` from time to time.

At this particular time, it looks like the following:

appinventor-jos$ ant -p
Buildfile: ~/appinventor/build.xml
Other targets:

AIMergerApp
Blockly
BlocklyTest
PlayApp
RunLocalBuildServer
all
clean
comps
installplay
javadoc
noplay
tests

Default target: all


As you can see, there are a number of targets here, but in this post I will only go into the ones I consider that save time during development. The following are only recommendations, you do not have to do this, of course!

Also consider that if you see a new target being added, make sure you understand how to use it because it can save you some time in the long run.

Tip 2: avoid using `ant clean` whenever you can.

Compiling App Inventor is done incrementally, so only what's needed to be compiled will be compiled. Unfortunately, the GWT part of the system takes literally ages when a full compilation needs to happen (see Tip 6 for more on this). If you are making changes in that part of the system, you are kind of stuck with a full compilation, but it does not mean you need to clean all the time.

The clean target does not only delete all the compiled files, but also deletes all your projects, so use with caution. When would you use clean, then? Well, if things start to get weird, like rare errors you haven't seen before, or compilation errors that do not seem to appear in your IDE, then it's time to clean. Another good indication of cleaning time is if you change branches that contain incompatible code. But if you can avoid this, there are a number of other targets that can help you out. Let's see some of them.

Tip 3: When in Blocky Land, do as the Blocklians do.
All the App Inventor Blockly related code gets compiled into a single file called blockly-all.js that you will find in your build folder. If you are making JavaScript changes (and only in the /blocklyeditor or lib/blockly files) you can rebuild this file by calling `ant Blockly` (note the Capital B). No other files need rebuilding (generally), and this target takes time in the order of seconds and not minutes! Make sure you check out tip 4 to see how to reload this file without restarting the main server.

Tip 4: There's no need to restart the main server --- most of the time!
Most times there is no need to restart the app engine server. By disabling caching in your browser(s) and reloading the project, all should be good to go.
You can disable caching in Chrome Dev tools or in Firefox (probably in Safari too!).

In Firefox, go to 'Tools --> Web Developer --> Developer Toolbar' and click on the wrench icon at the end of the toolbar, at the bottom of the page. The toolbar will enlarge and then you can click on a gear icon for settings. Scroll down to 'Advanced Settings' and you will see an option like the one in the following figure:
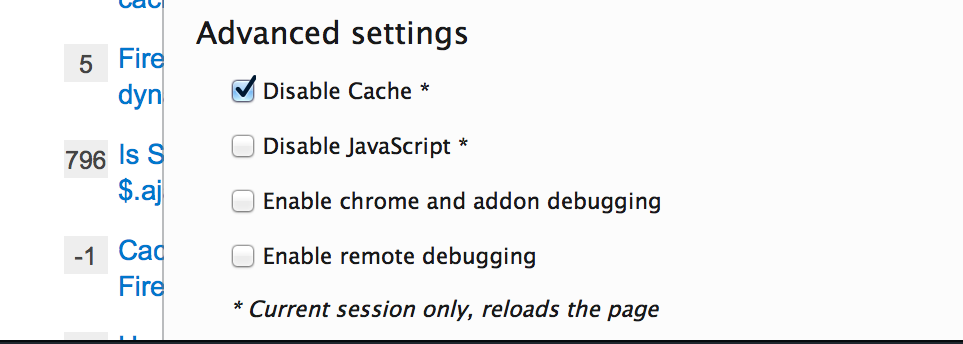
Disabling cache - Firefox


In Chrome Dev Tools you simply need to click on the gear icon for settings and you will see something similar to the next figure:
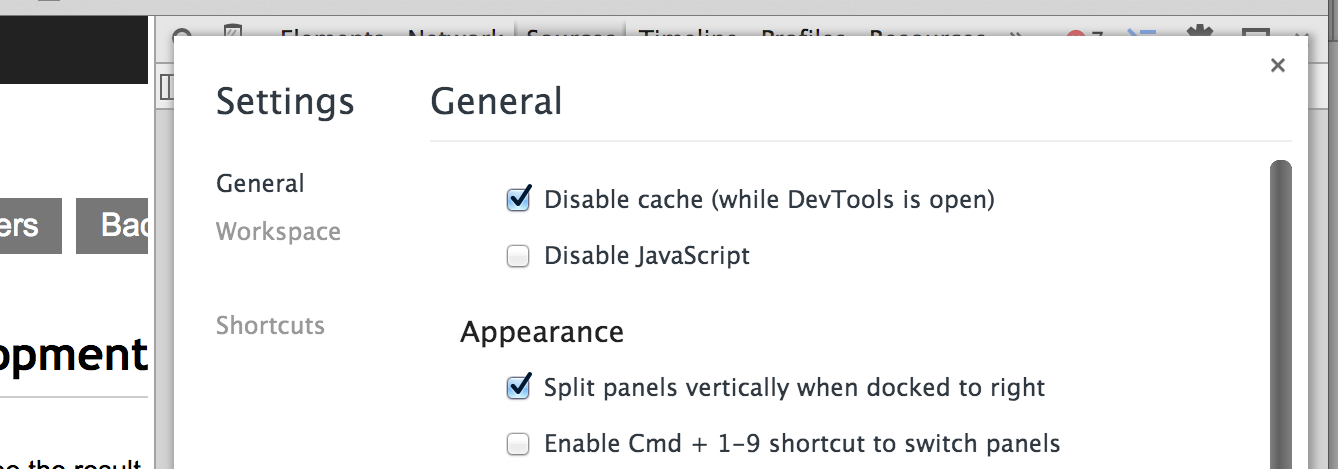
Disabling caching - Google Chrome


Note that disabling cache only applies when you have the dev tools open, so you don't have to worry about your normal web surfing with this setting.

Tip 5: Component changes might not need a full build
UNLESS you change the signature of a method (in blocks this can be a method or event signature, or a property), you will not need to reflect those changes in the designer, so there's no need to build the GWT part of the system.

When no changes to the designer are needed, you can use `ant comps`, which will not only compile exclusively changes to your component, but will also push a freshly baked App Inventor Companion app to your phone if you have it connected through USB.

Tip 6: Minimize permutations in GWT compilation
There are two ways of minimizing the number of compilations that GWT will run during a full build, one being restricting the number of browsers you build for, and the second being the number of languages you fully build. These changes can be made in the YaClient.gwt.xml file.

If you generally develop only using Chrome, or Safari, or Firefox, you can modify the GWT config file to avoid building for other browsers. In line 10 in the following gist, in the value for user.agent you can choose between 'safari' and 'gecko1_8'. If you generally only use firefox, you can delete everything before the comma (including the comma). If you generally use chrome or safari, keep the safari value and delete the comma and the gecko part. This will compile GWT only for the browser you have chosen.

Since we have introduced the internationalization code, the more languages we add, the longer it takes to build (more permutations of the code). In the gist again, if you comment out lines 104 to 109, both included, you will only build the interface in English.

You can combine languages and browser and go down to 2 permutations instead of 9, which will save several minutes from your build.

Tip 7: Do you really need that build server running all of the time?
This isn't really a compilation tip, but it might also save you time while developing.
Some people use a starting script that runs both the app engine server and the build server. Most of the time (note, not all of the time!) you will be making a bunch of changes and testing them on the companion if they are component changes, or in the browser if they are interface changes. You will only build an apk towards the end of the process (in component changes) before submitting a pull request. So you won't need to spin up the build server most of the time.

NOTE
As mentioned at the top of this post, please note that most of these tips are to be used only during development, BUT before you open a pull request, you should test fully, and with all languages and all browsers.

Happy (and hopefully shorter) building!


Thursday, July 24, 2014

Support for building apps on API Level 4 in App Inventor - Better Tablet Support

We've been working to take App Inventor out of screen compatibility mode, and that work has now been merged. This hasn't made it to a release yet, but it will soon. We will announce the changes in the forums when this happens.

What does it all mean though?
For starters, App Inventor will not support Android 1.5 (API level 3 - Cupcake) anymore, but we are compiling against Android 1.6 (API level 4 - Donut). We know there aren't a lot of devices out there still working at this level, but the change from level 3 to 4 was a rather large step to take, mainly because of the already mentioned screen compatibility mode.

Up to now, all App Inventor apps would be automatically scaled by the system to make them look the same in all devices, no matter their resolution or screen size. This sounds good, but the effect of this was that most elements would look rather awfully oversized on bigger screens such as tablets.  From now on, the resolution of the device will be used, and apps will look much better in larger screens with higher resolutions. As a drawback, the App Inventor designer will be a bit less in sync with what's actually being rendered on the device, but we've done our best to keep things as smooth as possible. If you find any issues with rendering in the designer please do get in touch with us through the forum.

What other changes have been made?
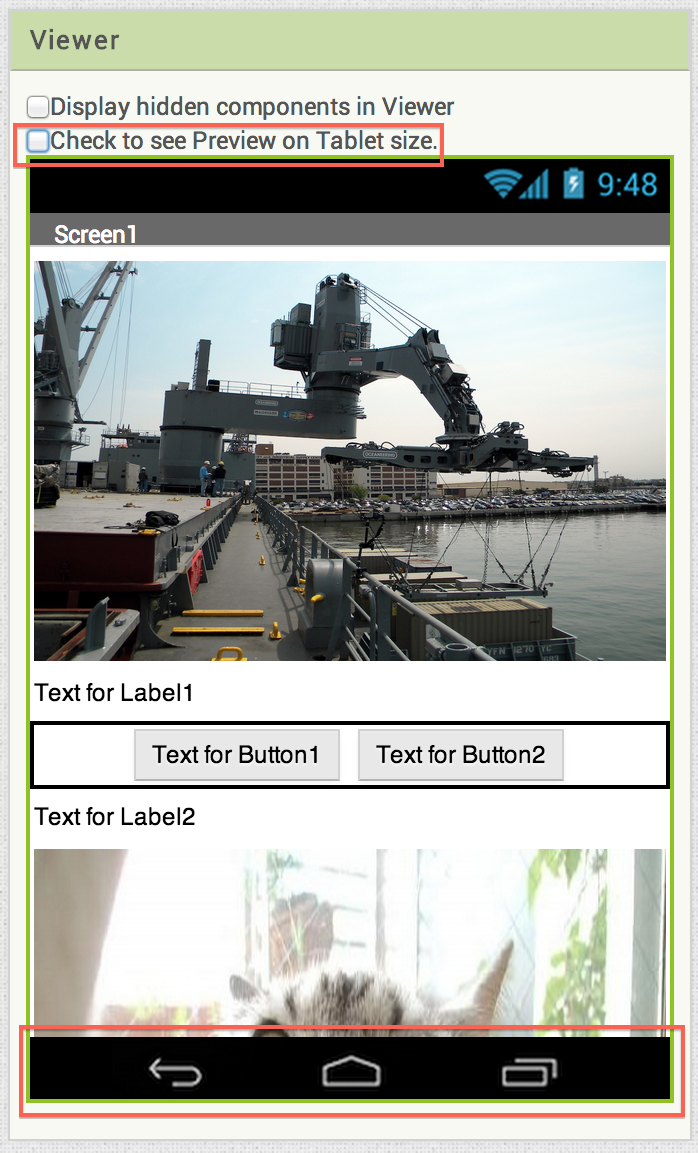
We have added a check to change from Tablet to Phone preview mode. It basically resizes the viewer so that you can see how the app looks at two different sizes. We are using Nexus sizes as generic here, Nexus4 for phone, and Nexus7 for tablet. As you can see in the screenshot below, we have also added the buttons bar found in most newer devices. The two changes are highlighted in red.


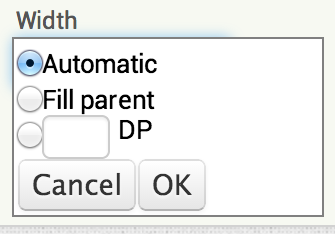
Another big change is that now all sizes for elements are density-independent pixels (DP) instead of hardcoded pixels. You will see a change in the Width and Height boxes in the designer.


The concept of DP is a little hard to grasp. Some people compare it to using percentages for sizes in HTML, but that's not quite correct. This is the definition used in the main Android docs:

Density-independent pixel (dp)

A virtual pixel unit that you should use when defining UI layout, to express layout dimensions or position in a density-independent way.
The density-independent pixel is equivalent to one physical pixel on a 160 dpi screen, which is the baseline density assumed by the system for a "medium" density screen. At runtime, the system transparently handles any scaling of the dp units, as necessary, based on the actual density of the screen in use. The conversion of dp units to screen pixels is simple:
px = dp * (dpi / 160). For example, on a 240 dpi screen, 1 dp equals 1.5 physical pixels. You should always use dp units when defining your application's UI, to ensure proper display of your UI on screens with different densities.

This DesignBytes video by Roman Nurik is a good source of information about the topic:


There is an additional property that has also been added to Images: scaleToFit; checking this box you can make an image fit completely the size of its enclosing area, for instance if you fill the parent in width or height, the image will fit the area (the image will not keep its aspect ratio, so be mindful when using this property).


So, with all these changes, what are the things to watch out for?
Some apps might be affected, especially those using hardcoded sizes in pixels. We have made many tests and the majority show very little differences, but there might still be some differences.
The other thing to watch out for is if you were using any tricks to grab the height and width of the screen to size your elements. Watch out for problems in there and please report whatever you find.

And what's next then? Well, this change opens a number of possibilities for App Inventor apps. We can start thinking about using a targetSDK level now, even providing a property in Screen1 to allow the user to choose which level that is. We could also start thinking about moving to API Level 8 (Froyo) as there are not many devices using a level lower than that. But probably the most important change here is that we can now start using support libraries and think about adding some of the most used design patterns in Android, such as Action Bar, navigation patterns, or even themes.

This is all a bit far ahead, but there's no technical reason stopping us now from working on changes like those. If you want to help with any of these projects, do get in touch through the open source forum. Great times ahead!

Friday, June 20, 2014

Software Engineer / Research position - MIT App Inventor

The MIT App Inventor team is looking for a software engineer with interest in research in education, and, of course, open source.
You can find more information in this thread. If you want to know a little more about what we do, you can keep on reading this blog, or ping me on twitter and I'll be happy to talk to you.

What are you waiting for to apply? do it... now!

Wednesday, May 28, 2014

App Inventor 2 - Translation Component

In a previous post I talked about the new Yandex.Translate component that we added to App Inventor 2 about a week ago. In this video you can see how to use it.


Make sure you don't tamper with the Yandex note in the About this App Screen as it is a design requirement stated in the terms of use of the Yandex.Translate service.


Monday, May 26, 2014

Breaking changes for DatePicker in App Inventor 2

We've decided to to push a breaking change to our production server, which is something we very rarely do. The reason was that some Java style thinking leaked into one of the components, the DatePicker.

When I wrote that component I was obviously thinking about something else, and I broke one of the most distinctive abstractions that we use in App Inventor: all our sequences are 1-based and not 0-based. Newcomers to programming find this a lot easier to grasp. Because Java returns month numbers on a 0-based array, I went with that and our Month attribute returned 0 for January and 11 for December.
Because the component has not been out for long, we have decided that it's better to change it now and take the heat than leaving this leaked abstraction hurting our users.

More info in this announcement in the forums, and I've added an annotation to the video and post. This break will only affect you if you are still working on an app that uses this component, or if you want to upgrade an app that you programmed in the last week, and you were using some type of correction to counteract the fact that the sequence was 0-based. Otherwise, it should not affect you (we are hoping this affects to only a few developers).

Apologies for this breaking change; it is something that should never happen (again!).

Saturday, May 24, 2014

Note for developers about the new translation component in App Inventor 2

We have recently added a translation component based on the Yandex.Translate service.

This service needs an API key to work, and as you can imagine, we have not pushed that into the repo. In fact, we cannot circulate that key, so if you are creating your own distribution of App Inventor or simply running your own server from the MIT repository, you will have to add that key to the source code before you compile the system.

This is an easy thing to do; once you have created a Yandex account, you can request a key. After that, paste that key in the component.

  public YandexTranslate(ComponentContainer container) {
    super(container.$form());

    // Set up the Yandex.Translate Tagline in the 'About' screen
    form.setYandexTranslateTagline();

    // TODO (user) To provide users with this component you will need to obtain
    // a key with the Yandex.Translate service at http://api.yandex.com/translate/
    yandexKey = "";
    activity = container.$context();
  }

The place to paste it is in the yandexKey string available in the constructor, as shown in the code above. The instructions in the TODO are rather explicit.

And that would be all if you think that all your users will not generate enough traffic to go over the limits of a particular key. If that is not the case, I would recommend to modify the component to allow your users to add their own keys when creating apps. This is what we do in some other components such as Twitter or FusionTables.

Also note that this component, when being used, adds some information to the About screen in the app:


This is a design requirement that is mandatory to use the service. If you decide to tamper with that, or you have disabled the About screen, I would recommend to find another solution to keep this requirement or you will be breaching the terms of use for the service.

Monday, May 19, 2014

App Inventor 2 Spinner component

A Spinner in Android provides a quick way to choose from a set of options. We have added a Spinner to App Inventor 2, and it's super easy to use. Have a look at the following video to find out how.

App Inventor 2 ListView component

The existing ListPicker allows to generate a series of choices to let the user decide which one to choose; for this, it creates a new Screen (or activity). The new ListView component works in the same way, with an almost identical API, but it does not create an additional screen, so you can embed your data within the Screen you are working on. The following video explains the basics of ListView in App Inventor 2.


Date and Time pickers in App Inventor 2

IMPORTANT UPDATE: There has been an upgrade to the Component and now it returns 1 = January and 12 = December for the Month property.

We have added two very simple widgets to App Inventor 2 (note they won't be added to App Inventor 1, but if you cherry pick the commit to the AI1 branch, it should work too). Date picker and Time picker are really easy to use, as you can see in this video:

Sunday, May 18, 2014

MIT App Inventor: Enabling Personal Mobile Computing

A few months ago Shay Pokress and I submitted a paper for the PROMOTO2013 workshop at SPLASHCONF13. The paper got accepted and I got to go to Indiana to do a tool demo for App Inventor and present a poster too. This is the slide deck used at the conf:

Saturday, May 17, 2014

App Inventor - Related Research

This is another slide deck from an MIT 6.S198 lecture, this time about EdTech in general, and more specifically about the many research influences that App Inventor and other similar systems share.


If you want to know more about the class, feel free to browse (and use, reuse, redistribute, improve, and so forth!) the materials linked from the class' calendar.

Friday, May 16, 2014

JavaScript for Developers @MIT 6.S198 - Fall 13

As part of the App Inventor class we run last semester at MIT, I prepared (or I should say rehashed, cause I had used this same material before for training) this presentation about JavaScript for developers familiar with other programming languages.


If this is of interest to you, you can consult the calendar and all materials for the class here.

Thursday, April 24, 2014

Sharing component for App Inventor

We released a new Sharing component about a week ago, and I recorded a rough and ready video for it. It uses and Android Intent to share information (a message or a file, or both) with other apps that are ready to handle the data provided.


We had to iron out a few things, such as paths coming from other components like the ImagePicker or the Camera.  We also had to deal with the fact that the dialog would come up really big for certain actions, and on certain devices. We have a fix for all of that, and it's on review right now, but will soon be in our github repo; it might take a bit longer to go live (next release for sure, but we don't know right now when that is happening).

Friday, June 21, 2013

Open Source Development with App Inventor: Part 6 : Wrapping Up Series 1

Show all videos of this series.
Part 6 of Open Source Development with App Inventor will be the last video that I'm going to record for now. Most of the basics have been covered, so I have decided to take a break from videos, and probably go back to writing more focused posts. In any case, don't expect much from me until the end of the summer!
If you have any topics that you'd like me to cover, and think it's worth making a video of it, please leave a comment.

The last couple of hangouts have been focused on the part of App Inventor that, in my opinion, is the most technically interesting: how incremental development happens in the REPL, which for us can either mean the emulator, or a connected device (via USB or wifi). I know little about that part, so I guess that's why I find it so interesting. If you want to know more about incremental development, you cannot miss out watching the hangout in May, in which Jeff talks about it, and also about the rendezvous server used with the Companion app(wifi mode). The video is here:


For more information on how Java interoperation is achieved through Kawa, the June hangout should help:


There are a number of very important topics for App Inventor development, and I briefly cover some of them in the video. Please use the mailing list for discussion, ranging from ideas or improvements, to stickier topics such as what the primary audience for App Inventor is, should the focus shift towards other targets, and so on.
There's been a number of new distributions appearing (if you follow the forums, you can see the work Hossein, Gary, or Dave Wolber are doing). These are all great, but it would also be great if, as a community, we can talk about how to best approach things and design for interoperability. A couple of good examples in the forums are the threads about the sqlite component, and a discussion titled the dangers of fragmentation. Please keep active in the forums and irc.

The last subject in this video briefly covers how to work with App Inventor 2 (codename: newblocks) from the github account.

And finally, here's the video for Part 6:


Enjoy!

Saturday, June 15, 2013

Open Source Development with App Inventor: Part 5 : Your own Personal Companion

Show all videos of this series.
In this part of the video series we are going to see how to package our own Companion app. This is the app that can be used with wifi for development purposes (no USB cable needed).


As explained in the video, the reason why you would want to create your own app is that the Companion contains a copy of each of the Components available in the system. If you develop a new component, this new guys and its blocks will not be available in an app distributed by MIT. You can create your own app by using an ant target available in the main build script:

ant PlayApp

Make sure that you manually uninstall any other Companion apps before installing the newly created one, especially if you have installed an app distributed by MIT. The reason is that the apps, even though they can have the same name, are going to be signed with different keys, and the phone might get a bit confused.


If for any reason you need a Companion app for an older version of App Inventor, you can create one using the MIT repo git tags. One thing I forgot to mention in the video is that to update the tags from the repo, you have to fetch them. This can be done by executing (assuming you have called the remote 'upstream'):

git fetch upstream

These are the steps to move to a different commit (in this case we use a tag, but a commit would work too), and create the new-old Companion app:

0. make sure you are in clean state, in master, and with all the latest from upstream (mit-cml)
1. sync with upstream to grab all the tags: git fetch upstream
2. checkout the tag you want to build the companion for: git checkout v133
  - this will put you in detached head mode
3. ant clean; ant; ant PlayApp
 - this creates: MIT Companion app.apk
4. git co master to go back to master.

 And that is all for this video, catch you in the next one!

Saturday, June 8, 2013

Open Source Development with App Inventor: Part 4 : Android Activity Lifecycle

Show all videos of this series.
The training site for Android is full of great resources. If you have an interest in Android development, I would recommend to go through all of the sections, but if your time is limited and you can only go through a bunch of them, you should not skip Managing the Activity Lifecycle.

Always keep the following figure in mind when developing and app, and App Inventor provides hooks to the Activity Lifecycle through the Form class:

Activity Lifecycle, from Android training site.


The following video shows those hooks, and the main interfaces used to that effect:


In the next video we will be showing how to package the Companion app from sources, and explaining why you would want to do that in first place.

Wednesday, May 29, 2013

Open Source Development with App Inventor: Part 3 : Read the source Luke

Show all videos of this series.
Welcome to another video of the Open source development with App Inventor series. In part 3 we will go through the sources by reviewing how new Components are created. We will see some of the main parts of the Twitter component, and what parts of the system need changing to make sure that everything is kept in sync.

The image that opens the video was taken from Coding Horror, a fantastic blog about software development.


The main two documents used in this video are:

In the next video we will be talking a little bit about the Android lifecycle, how it affects App Inventor apps, and how the codebase hooks into the methods provided by the Android SDK. Catch you then!

Monday, May 20, 2013

Open Source Development with App Inventor: Part 2 : Working with the Sources and Git

Show all videos of this series.
In this part of the Open Source Developement with App Inventor series, we'll see how to work with the sources. My first (and only) attempt at recording it was getting too long, so I decided to divide this part in several videos (3 in total).

In the first video (titled Part 2), we'll see the documents that are the base of all the actions explained in the video. These are mainly two, How to build App Inventor from MIT sources, and Developing App Inventor with git and github. As mentioned in the video, if you just want to run App Inventor locally, and do not expect to be changing the sources at all, then the first document is enough. If you want to work a bit on the sources, make some changes, or create your own components, then you need to read both documents. And here is the first video:


In the second video (titled Part 2 and a Half), we see how to sync with the remote or upstream repository. Git is a distributed version control system. If you have worked with a system like subversion before, Git might be a bit difficult to grasp at the beginning. Here's a good comparison article between centralised and distributed source control. If you haven't gone through the Git resources highlighted in previous videos of this series, please do so now. In this video we will see how we can get our github Fork synchronised with the main repository maintained by the MIT team.


The third video (titled Part 2 and Three Quarters) shows how, once the sources have been built, the system can be locally launched. As explained in previous videos of this series, there are two main servers that you need to get running to play with App Inventor locally, one is the server portion of the appengine project that backs the Designer interface, and the other one is the Build Server that creates the apk files for your projects. Here's how you can do that:


Wednesday, May 8, 2013

Open Source Development with App Inventor: Part 1 : Developer Overview

Show all videos of this series.
In this second part of the video series we are going to explore the basics of the system, at a very high level. A description of the different projects and what they do is given.


The links for this part are:

Where to find stuff?
Main OSS Website: http://appinventor.mit.edu/appinventor-sources/
Forum: https://groups.google.com/forum/#!forum/app-inventor-open-source-dev
IRC Channel: freenode.net #appinventor

Other links:

Thursday, May 2, 2013

Open Source Development with App Inventor: Part 0

Show all videos of this series.
I am a big fan of tech video series. If I recall correctly, railscasts was the first one I watched, probably at about the same time that I started following TED talks (although the latter are not really a 'series' in itself, and not always about tech). Much more recently, I have very thoroughly enjoyed the AngularJS videos in egghead.io, and I tend to watch as many full conferences as I can.

No surprises here then if I tell you that I have started recording my own series, right? The topic is App Inventor and Open Source. I have no idea how often I'll get a chance to record a video, but if you want me to talk about an specific part of the project, I'll do my best to get it online. I will always try to keep them shorter than 10 minutes (that's the format I generally enjoy more), so some topics will be divided into multiple videos. I do not intend to do any editing, so at times, you'll see me doing some weird stuff and getting it all wrong, but I won't be cutting stuff off, mostly for the sake of learning. Feel free to shout to the screen (as I do... at times...) or leave a comment, and I'll do my best to get it right in another video.

I am going to start with the basics, but this isn't really a 'Learn Java' kind of series; there are millions of resources out there to learn Java and Android, so I doubt we need yet another one (and I also doubt I can do a better job!). So if you know a bit of Java (or some other language), and you are familiar with the command line, and building programs from it, you are all set for the series... so let's get started!

Part 0: Before you start


Here are the links in the video:

Where to find stuff?
Main OSS Website: http://appinventor.mit.edu/appinventor-sources/
Forum: https://groups.google.com/forum/#!forum/app-inventor-open-source-dev
IRC Channel: freenode.net #appinventor

Other links:
Article about the command line.
Github and CodeSchool interactive tutorial.