Friday, June 21, 2013

Open Source Development with App Inventor: Part 6 : Wrapping Up Series 1

Show all videos of this series.
Part 6 of Open Source Development with App Inventor will be the last video that I'm going to record for now. Most of the basics have been covered, so I have decided to take a break from videos, and probably go back to writing more focused posts. In any case, don't expect much from me until the end of the summer!
If you have any topics that you'd like me to cover, and think it's worth making a video of it, please leave a comment.

The last couple of hangouts have been focused on the part of App Inventor that, in my opinion, is the most technically interesting: how incremental development happens in the REPL, which for us can either mean the emulator, or a connected device (via USB or wifi). I know little about that part, so I guess that's why I find it so interesting. If you want to know more about incremental development, you cannot miss out watching the hangout in May, in which Jeff talks about it, and also about the rendezvous server used with the Companion app(wifi mode). The video is here:


For more information on how Java interoperation is achieved through Kawa, the June hangout should help:


There are a number of very important topics for App Inventor development, and I briefly cover some of them in the video. Please use the mailing list for discussion, ranging from ideas or improvements, to stickier topics such as what the primary audience for App Inventor is, should the focus shift towards other targets, and so on.
There's been a number of new distributions appearing (if you follow the forums, you can see the work Hossein, Gary, or Dave Wolber are doing). These are all great, but it would also be great if, as a community, we can talk about how to best approach things and design for interoperability. A couple of good examples in the forums are the threads about the sqlite component, and a discussion titled the dangers of fragmentation. Please keep active in the forums and irc.

The last subject in this video briefly covers how to work with App Inventor 2 (codename: newblocks) from the github account.

And finally, here's the video for Part 6:


Enjoy!

Saturday, June 15, 2013

Open Source Development with App Inventor: Part 5 : Your own Personal Companion

Show all videos of this series.
In this part of the video series we are going to see how to package our own Companion app. This is the app that can be used with wifi for development purposes (no USB cable needed).


As explained in the video, the reason why you would want to create your own app is that the Companion contains a copy of each of the Components available in the system. If you develop a new component, this new guys and its blocks will not be available in an app distributed by MIT. You can create your own app by using an ant target available in the main build script:

ant PlayApp

Make sure that you manually uninstall any other Companion apps before installing the newly created one, especially if you have installed an app distributed by MIT. The reason is that the apps, even though they can have the same name, are going to be signed with different keys, and the phone might get a bit confused.


If for any reason you need a Companion app for an older version of App Inventor, you can create one using the MIT repo git tags. One thing I forgot to mention in the video is that to update the tags from the repo, you have to fetch them. This can be done by executing (assuming you have called the remote 'upstream'):

git fetch upstream

These are the steps to move to a different commit (in this case we use a tag, but a commit would work too), and create the new-old Companion app:

0. make sure you are in clean state, in master, and with all the latest from upstream (mit-cml)
1. sync with upstream to grab all the tags: git fetch upstream
2. checkout the tag you want to build the companion for: git checkout v133
  - this will put you in detached head mode
3. ant clean; ant; ant PlayApp
 - this creates: MIT Companion app.apk
4. git co master to go back to master.

 And that is all for this video, catch you in the next one!

Saturday, June 8, 2013

Open Source Development with App Inventor: Part 4 : Android Activity Lifecycle

Show all videos of this series.
The training site for Android is full of great resources. If you have an interest in Android development, I would recommend to go through all of the sections, but if your time is limited and you can only go through a bunch of them, you should not skip Managing the Activity Lifecycle.

Always keep the following figure in mind when developing and app, and App Inventor provides hooks to the Activity Lifecycle through the Form class:

Activity Lifecycle, from Android training site.


The following video shows those hooks, and the main interfaces used to that effect:


In the next video we will be showing how to package the Companion app from sources, and explaining why you would want to do that in first place.

Wednesday, May 29, 2013

Open Source Development with App Inventor: Part 3 : Read the source Luke

Show all videos of this series.
Welcome to another video of the Open source development with App Inventor series. In part 3 we will go through the sources by reviewing how new Components are created. We will see some of the main parts of the Twitter component, and what parts of the system need changing to make sure that everything is kept in sync.

The image that opens the video was taken from Coding Horror, a fantastic blog about software development.


The main two documents used in this video are:

In the next video we will be talking a little bit about the Android lifecycle, how it affects App Inventor apps, and how the codebase hooks into the methods provided by the Android SDK. Catch you then!

Monday, May 20, 2013

Open Source Development with App Inventor: Part 2 : Working with the Sources and Git

Show all videos of this series.
In this part of the Open Source Developement with App Inventor series, we'll see how to work with the sources. My first (and only) attempt at recording it was getting too long, so I decided to divide this part in several videos (3 in total).

In the first video (titled Part 2), we'll see the documents that are the base of all the actions explained in the video. These are mainly two, How to build App Inventor from MIT sources, and Developing App Inventor with git and github. As mentioned in the video, if you just want to run App Inventor locally, and do not expect to be changing the sources at all, then the first document is enough. If you want to work a bit on the sources, make some changes, or create your own components, then you need to read both documents. And here is the first video:


In the second video (titled Part 2 and a Half), we see how to sync with the remote or upstream repository. Git is a distributed version control system. If you have worked with a system like subversion before, Git might be a bit difficult to grasp at the beginning. Here's a good comparison article between centralised and distributed source control. If you haven't gone through the Git resources highlighted in previous videos of this series, please do so now. In this video we will see how we can get our github Fork synchronised with the main repository maintained by the MIT team.


The third video (titled Part 2 and Three Quarters) shows how, once the sources have been built, the system can be locally launched. As explained in previous videos of this series, there are two main servers that you need to get running to play with App Inventor locally, one is the server portion of the appengine project that backs the Designer interface, and the other one is the Build Server that creates the apk files for your projects. Here's how you can do that:


Wednesday, May 8, 2013

Open Source Development with App Inventor: Part 1 : Developer Overview

Show all videos of this series.
In this second part of the video series we are going to explore the basics of the system, at a very high level. A description of the different projects and what they do is given.


The links for this part are:

Where to find stuff?
Main OSS Website: http://appinventor.mit.edu/appinventor-sources/
Forum: https://groups.google.com/forum/#!forum/app-inventor-open-source-dev
IRC Channel: freenode.net #appinventor

Other links:

Thursday, May 2, 2013

Open Source Development with App Inventor: Part 0

Show all videos of this series.
I am a big fan of tech video series. If I recall correctly, railscasts was the first one I watched, probably at about the same time that I started following TED talks (although the latter are not really a 'series' in itself, and not always about tech). Much more recently, I have very thoroughly enjoyed the AngularJS videos in egghead.io, and I tend to watch as many full conferences as I can.

No surprises here then if I tell you that I have started recording my own series, right? The topic is App Inventor and Open Source. I have no idea how often I'll get a chance to record a video, but if you want me to talk about an specific part of the project, I'll do my best to get it online. I will always try to keep them shorter than 10 minutes (that's the format I generally enjoy more), so some topics will be divided into multiple videos. I do not intend to do any editing, so at times, you'll see me doing some weird stuff and getting it all wrong, but I won't be cutting stuff off, mostly for the sake of learning. Feel free to shout to the screen (as I do... at times...) or leave a comment, and I'll do my best to get it right in another video.

I am going to start with the basics, but this isn't really a 'Learn Java' kind of series; there are millions of resources out there to learn Java and Android, so I doubt we need yet another one (and I also doubt I can do a better job!). So if you know a bit of Java (or some other language), and you are familiar with the command line, and building programs from it, you are all set for the series... so let's get started!

Part 0: Before you start


Here are the links in the video:

Where to find stuff?
Main OSS Website: http://appinventor.mit.edu/appinventor-sources/
Forum: https://groups.google.com/forum/#!forum/app-inventor-open-source-dev
IRC Channel: freenode.net #appinventor

Other links:
Article about the command line.
Github and CodeSchool interactive tutorial.

Wednesday, April 24, 2013

Long running tasks in App Inventor Components

(Many thanks to Mark Friedman from Google for his review and great comments).

As mentioned in the post about the UI thread, App Inventor is basically a UI centric system, in the sense that everything happens within a Screen. For this reason, when tasks that might take a bit of time to finish are required, they should be done in their own thread, or otherwise the full UI will come to a halt until the task finishes up.

Examples of long running tasks could be, among others, any operations that need access to external resources, such as the calls in the Web component, the calls to the Twitter API, calls to reading from the SD card, sending or retrieving data in TinyWebDB calls, and so on.

So how can these kind of operations be dealt with? Mainly by dividing the process into two stages, a first part that spins a new thread to deal with the operation itself, and a second part that can trigger an event back in the UI thread, once the operation is finished. This is the core idea behind Event-Driven Architectures or Event-Driven Programming, and most toolkits for creating graphical interfaces use it widely.

According to Wikipedia, Event-driven Programming can be defined as:
[...] an application architecture technique in which the application has a main loop which is clearly divided down to two sections:
  • the first is event selection (or event detection)
  • the second is event handling.
Let’s see it with a concrete example; Think about how the Web component in App Inventor works:
Part 1: Call Get : Part 2: when GotText gets triggered, handle it.

The user will place a Web.Get call block in a handler(such as a button click), and configure the component with the URL to be accessed. That is part 1 of our event-driven design. For part 2, the user needs to place a Web.GotText event block (or Web.GotFile) in the blocks editor, and they are assured that when this event is triggered, they can access the contents of the resource they had asked for (as well as the response code and type).

In programming terms, for a component developer, the Web.Get call block will have to create and launch a new thread to grab the resource that the user wants from the Internet. Once the resource is retrieved, this new thread will communicate back to the app by triggering the Web.GotText event in the UI thread. Let’s see this in code.

First part: running a new thread with the request
  @SimpleFunction
  public void Get() {
    [... some config code here ...]

    AsynchUtil.runAsynchronously(new Runnable() {
      @Override
      public void run() {
        try {
          performRequest(webProps, null, null);
        } [... exception handling code here ...]
      }
    });
  }

The main thing we want to observe here is that the call to performRequest is done inside a Runnable object, which will be a thread spawning from the UI thread. This is step 1 of our event-driven design. Whatever we need to do in this method, and however long it takes, is not a concern anymore (to a certain extent!) because it will be performed outside of the UI thread.

Second part: processing the request and going back to the UI thread
Lets see now what the performRequest method does, and how it connects back to the UI thread:

  private void performRequest(final CapturedProperties webProps, byte[] 
    postData, String postFile) throws IOException {

    // Open the connection.
    HttpURLConnection connection = openConnection(webProps);
    if (connection != null) {
      try {
        if (postData != null) {
          writePostData(connection, postData);
        } [... other code to write to file ...]   
        [... some more code to deal with the data; note that this code, and
             other actions such as opening a HTTP connection at the top of
             this method, can take a long time ...]
          // Dispatch the event.
          activity.runOnUiThread(new Runnable() {
            @Override
            public void run() {
              GotText(webProps.urlString, responseCode, responseType, path);
            }
          });
        [... more code to handle files instead of text responses ...]
      } finally {
        connection.disconnect();
      }
    }
  }

What is going on here? Well, a HTTP connection is opened against the resource on the web that the user wants to access. Depending on configuration, the user can decide to save the response to a file, or in the code that we can see here, just treat it as text. Once the data is read from the web, this thread’s job is done, and it can invoke the user’s event handling block, which runs in the UI thread. It will do so by triggering the GotText method inside a Runnable object, but as you can see, it is run through the activity.runOnUiThread method in order to switch back to the UI thread.
Note that operations such as opening a HTTP connection will take a while and will also block the thread until they are done. That concept of blocking the thread is exactly what we are trying to avoid in the UI thread, but we don’t mind if this other thread gets blocked for as long as it needs. This is the basis of Asynchronous programming as explained in the previous blog post, and we can take advantage of it to give our users a more pleasant experience while using our apps.

Wondering what that AsyncUtil.runAsynchronously method in the Get function is about? Well, these longer tasks are so frequent in App Inventor that there is some supporting code to accomplish them. The class AsyncUtil.java can be used to spawn new threads for the component code. This is the method used in the Web component:

  /**
   * Make an asynchronous call in a separate thread.
   * @param call a {@link Runnable} to run in the thread.
   */
  public static void runAsynchronously(final Runnable call) {
    Thread thread = new Thread(call);
    thread.start();
  }

It’s very simple code; you pass in a Runnable object, and the method creates a thread and starts it. This is the basic threading mechanism in Java. For more information have a look at the Concurrency tutorial.


There are many other examples in the App Inventor sources showing this kind of event-driven approach to longer operations. When you are creating a component, think that any operation that needs to access resources such as the network or external storage, will need to be designed in this way. You might think that, for instance, if you only read small files from storage, then you will be fine doing it in the UI thread. You might even try it, and test it for a bit, and convince yourself that it works fine, but believe me, it will not cut it in the real world. Think about users with slower and older devices, or slow connections to the Internet, or simply think of a device that, at a particular time, might be busy doing some other operation such as upgrading a different app. You really want to get your design correct and functional for all your users out there!

Tuesday, February 19, 2013

A Single Thread of Execution in App Inventor Screens

The development documentation provides a very good example of why certain things in the User Interface (UI) of an app happen in the way they do. In App Inventor we use Screens to lay out components to create the UI of the app.

The main idea is that all actions that affect the UI happen sequentially. Some examples of these kind of actions could be changing the text of a label, or handling users interacting with the app via a button or a text box.

Sequential execution in App Inventor means that different blocks can never interrupt each other.

Different blocks and handlers will always be executed in sequence. Once a block starts executing, it will execute till the end, no matter if there are other blocks reacting to the one in progress, or users pressing buttons in the app. On more technical terms, we say that everything in the UI is executed in one Thread, the UI Thread, which is responsible for all updates and interaction that happen in each Screen of your app. For this to happen, we need some kind of mechanism to keep track of what needs to be done next, and when something should be done. A very simple model would be a Queue, just like the one you join at the supermarket to pay for your shopping. Tasks can be added to a Queue in the same way that people join in the queue from the end of it.

With all this in mind, let's see the example in the documentation. (From How to add a component )

This gives a simple execution model for users: An App Inventor procedure will never be interrupted by an event handler, or vice versa; nor will one event handler be interrupted by another. This is illustrated in Figure 1:” (Ellen Spertus)

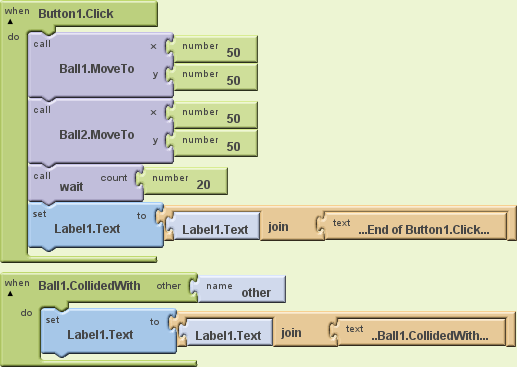
Figure 1: Sample program demonstrating serial semantics.
The example uses two Ball components, one CollidedWith handler that should fire as soon as Ball1 collides with anything, and an extra procedure called wait, which we don't really see what it does, but we are going to suppose that it takes 20 seconds to execute (imagine that it is loading content from the internet and it takes that long). All the code, except for the collision handler, is contained within a Click handler.
When Button1 is clicked, the two balls are positioned in exactly the same place, first Ball1, and then Ball2. Positioning the second ball in the same place as Ball1 should trigger the collision handler for Ball1. Some users would expect this to happen straight away, but if you were to execute this code, you would see that the collide handler will not execute until the click block finishes, and this would take at least 20 seconds because of the call to wait.

Following the same idea as above, you can think about the UI thread as if it was a Queue to get into the cinema; on arrival, ticket buyers will position themselves at the end of the queue.
When Button1 is clicked, we add the following things to the Queue:
  • position Ball1
  • position Ball2
  • wait
  • set Label1 text to : '...End of Button1.click...'

When Ball2 is positioned, the CollideWith handler is added to the Queue, but it cannot be executed straight away because the UI thread still has some tasks to do. So, after a couple of seconds we will see a queue such as:
  • position Ball1 (DONE)
  • position Ball2 (DONE)
  • wait (IN PROGRESS)
  • set Label1 to: '… End of Button1.click ...' (TO DO)
  • CollidedWith (added to the queue when the collision happens)
    • set Label1 text to: '… Ball1.CollidedWith ...' (TO DO)

So Ball2 makes the handle trigger, but that does not mean that it will be executed straight away, instead it means that it will be added to the queue in the UI thread.

In the end, Label1 will always be assigned the value '...End of Button1.click...' first, and the value '...Ball1.CollidedWith...' later.
When both blocks finish, it will always read: “...End of Button1.Click......Ball1.CollidedWith...”.

Please note that having a procedure like wait blocking the UI is a really bad idea in an app, because as we saw in the explanation above, the app will be unresponsive for those 20 seconds, and this is not a pleasant experience for the users. If your app needs to do some expensive processing, it is quite possible that this interaction will block the app for as long as it takes.

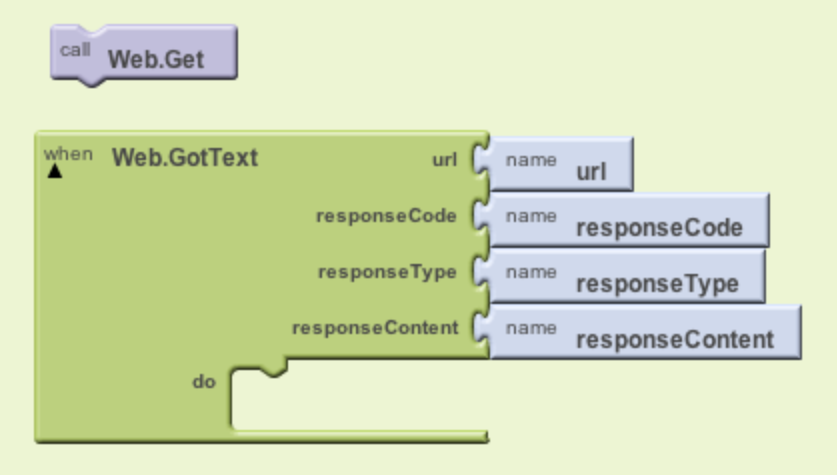
From a design and development point of view, it is also important to note that certain blocks in App Inventor were designed with the UI thread in mind, and broken down into two different stages. For instance, the Web component Get call could be considered part 1 of a call to a web resource. This call will not block the UI because it is not performed in the UI Thread. When the response from the Get call is received, then part 2 will execute, which would be the event GotText (or GotFile, depending on how Get was configured). If you are planning on developing a new component for App Inventor, you need to take this into account.

Also related to this idea of sequential execution, a lot of users ask why their timers do not fire on time, for instance exactly every 2 seconds. Actually the timers fire at the time they are supposed to, but this only means that their handlers get added to the scheduling queue for UI updates. If at that particular moment something else is executing in the Screen, then the actions fired by the timer will have to wait for those other actions to finish, before they can be triggered. But once they get next to be executed in the Queue, they will fire one after the other, not waiting for any intervals. The waiting was already done before joining the Queue. 

This is actually something very usual in UI libraries, from Java (Swing) to Android, and even JavaScript. The browser, in which JavaScript executes, also has a single thread of execution, generally called the event loop, and it will behave in the same way as App Inventor does. Same happens if you run JavaScript on the server through something like node.js.

This is all a simplification of what really happens, and Android can create other Threads of execution that do not conflict with the UI thread to carry on with other operations. For a deeper dig in the matter, follow the link in the Android documentation to the Painless Threading article.