I want to share a few tricks that some of us use for speeding up App Inventor when we are full on development mode. Note that most of these tricks should only be used while developing, but when you are ready to open a pull request you should skip all tricks, make a full compilation for all languages and browsers, and fully test (manually as much as you can, and always run `ant tests`).
The first thing you should check (at least from time to time) is the listing of available targets in the main ant script. Here is how:
Tip 1: check out all targets available with `ant -p` from time to time.
At this particular time, it looks like the following:
appinventor-jos$ ant -p

Buildfile: ~/appinventor/build.xml


Other targets:


 AIMergerApp

 Blockly

 BlocklyTest

 PlayApp

 RunLocalBuildServer

 all

 clean

 comps

 installplay

 javadoc

 noplay

 tests


Default target: all
As you can see, there are a number of targets here, but in this post I will only go into the ones I consider that save time during development. The following are only recommendations, you do not have to do this, of course!
Also consider that if you see a new target being added, make sure you understand how to use it because it can save you some time in the long run.
Tip 2: avoid using `ant clean` whenever you can.
Compiling App Inventor is done incrementally, so only what's needed to be compiled will be compiled. Unfortunately, the GWT part of the system takes literally
ages when a full compilation needs to happen (see Tip 6 for more on this). If you are making changes in that part of the system, you are kind of stuck with a full compilation, but it does not mean you need to
clean all the time.
The clean target does not only delete all the compiled files, but also deletes all your projects, so
use with caution. When would you use clean, then? Well, if things start to get weird, like rare errors you haven't seen before, or compilation errors that do not seem to appear in your IDE, then it's time to clean. Another good indication of
cleaning time is if you change branches that contain incompatible code. But if you can avoid this, there are a number of other targets that can help you out. Let's see some of them.
Tip 3: When in Blocky Land, do as the Blocklians do.
All the App Inventor Blockly related code gets compiled into a single file called
blockly-all.js that you will find in your
build folder. If you are making JavaScript changes (and only in the /blocklyeditor or lib/blockly files) you can rebuild this file by calling `ant Blockly` (note the Capital B). No other files need rebuilding (generally), and this target takes time in the order of seconds and not minutes! Make sure you check out tip 4 to see how to reload this file without restarting the main server.
Tip 4: There's no need to restart the main server --- most of the time!
Most times there is no need to restart the app engine server. By disabling caching in your browser(s) and reloading the project, all should be good to go.
You can disable caching in Chrome Dev tools or in Firefox (probably in Safari too!).
In Firefox, go to '
Tools --> Web Developer --> Developer Toolbar' and click on the wrench icon at the end of the toolbar, at the bottom of the page. The toolbar will enlarge and then you can click on a gear icon for settings. Scroll down to 'Advanced Settings' and you will see an option like the one in the following figure:
 |
| Disabling cache - Firefox |
In
Chrome Dev Tools you simply need to click on the gear icon for settings and you will see something similar to the next figure:
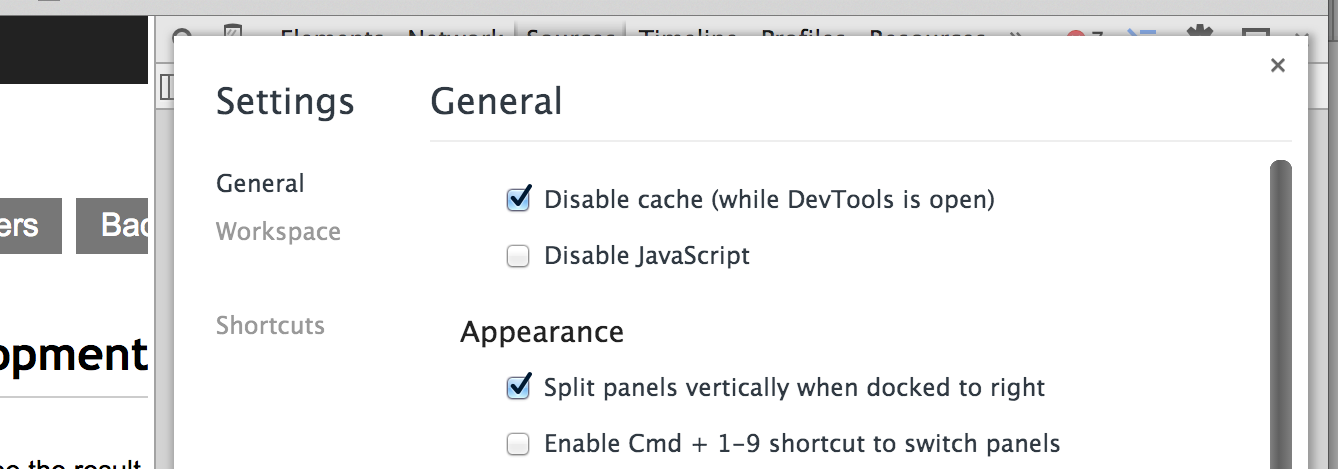 |
| Disabling caching - Google Chrome |
Note that disabling cache only applies when you have the dev tools open, so you don't have to worry about your normal web surfing with this setting.
Tip 5: Component changes might not need a full build
UNLESS you change the signature of a method (in blocks this can be a method or event signature, or a property), you will not need to reflect those changes in the designer, so there's no need to build the GWT part of the system.
When no changes to the designer are needed, you can use `ant comps`, which will not only compile exclusively changes to your component, but will also push a freshly baked App Inventor Companion app to your phone if you have it connected through USB.
Tip 6: Minimize permutations in GWT compilation
There are two ways of minimizing the number of compilations that GWT will run during a full build, one being restricting the number of browsers you build for, and the second being the number of languages you fully build. These changes can be made in the
YaClient.gwt.xml file.
If you generally develop only using Chrome, or Safari, or Firefox, you can modify the GWT config file to avoid building for other browsers. In line 10 in the following gist, in the value for
user.agent you can choose between 'safari' and 'gecko1_8'. If you generally only use firefox, you can delete everything before the comma (including the comma). If you generally use chrome or safari, keep the safari value and delete the comma and the gecko part. This will compile GWT only for the browser you have chosen.
Since we have introduced the internationalization code, the more languages we add, the longer it takes to build (more permutations of the code). In the gist again, if you comment out lines 104 to 109, both included, you will only build the interface in English.
You can combine languages and browser and go down to 2 permutations instead of 9, which will save several minutes from your build.
Tip 7: Do you really need that build server running all of the time?
This isn't really a compilation tip, but it might also save you time while developing.
Some people use a starting script that runs both the app engine server and the build server. Most of the time (note, not all of the time!) you will be making a bunch of changes and testing them on the companion if they are component changes, or in the browser if they are interface changes. You will only build an apk towards the end of the process (in component changes) before submitting a pull request. So you won't need to spin up the build server most of the time.
NOTE
As mentioned at the top of this post, please note that most of these tips are to be used only during development,
BUT before you open a pull request, you should test fully, and with all languages and all browsers.
Happy (and hopefully shorter) building!