Showing posts with label open source. Show all posts

Wednesday, October 8, 2014

App Inventor dev tricks: reducing compilation time while doing development

I want to share a few tricks that some of us use for speeding up App Inventor when we are full on development mode. Note that most of these tricks should only be used while developing, but when you are ready to open a pull request you should skip all tricks, make a full compilation for all languages and browsers, and fully test (manually as much as you can, and always run `ant tests`).

The first thing you should check (at least from time to time) is the listing of available targets in the main ant script. Here is how:

Tip 1: check out all targets available with `ant -p` from time to time.

At this particular time, it looks like the following:

appinventor-jos$ ant -p
Buildfile: ~/appinventor/build.xml
Other targets:

AIMergerApp
Blockly
BlocklyTest
PlayApp
RunLocalBuildServer
all
clean
comps
installplay
javadoc
noplay
tests

Default target: all


As you can see, there are a number of targets here, but in this post I will only go into the ones I consider that save time during development. The following are only recommendations, you do not have to do this, of course!

Also consider that if you see a new target being added, make sure you understand how to use it because it can save you some time in the long run.

Tip 2: avoid using `ant clean` whenever you can.

Compiling App Inventor is done incrementally, so only what's needed to be compiled will be compiled. Unfortunately, the GWT part of the system takes literally ages when a full compilation needs to happen (see Tip 6 for more on this). If you are making changes in that part of the system, you are kind of stuck with a full compilation, but it does not mean you need to clean all the time.

The clean target does not only delete all the compiled files, but also deletes all your projects, so use with caution. When would you use clean, then? Well, if things start to get weird, like rare errors you haven't seen before, or compilation errors that do not seem to appear in your IDE, then it's time to clean. Another good indication of cleaning time is if you change branches that contain incompatible code. But if you can avoid this, there are a number of other targets that can help you out. Let's see some of them.

Tip 3: When in Blocky Land, do as the Blocklians do.
All the App Inventor Blockly related code gets compiled into a single file called blockly-all.js that you will find in your build folder. If you are making JavaScript changes (and only in the /blocklyeditor or lib/blockly files) you can rebuild this file by calling `ant Blockly` (note the Capital B). No other files need rebuilding (generally), and this target takes time in the order of seconds and not minutes! Make sure you check out tip 4 to see how to reload this file without restarting the main server.

Tip 4: There's no need to restart the main server --- most of the time!
Most times there is no need to restart the app engine server. By disabling caching in your browser(s) and reloading the project, all should be good to go.
You can disable caching in Chrome Dev tools or in Firefox (probably in Safari too!).

In Firefox, go to 'Tools --> Web Developer --> Developer Toolbar' and click on the wrench icon at the end of the toolbar, at the bottom of the page. The toolbar will enlarge and then you can click on a gear icon for settings. Scroll down to 'Advanced Settings' and you will see an option like the one in the following figure:
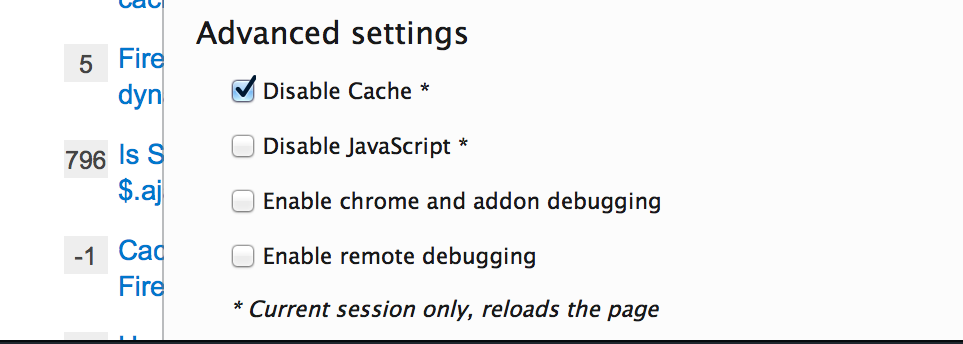
Disabling cache - Firefox


In Chrome Dev Tools you simply need to click on the gear icon for settings and you will see something similar to the next figure:
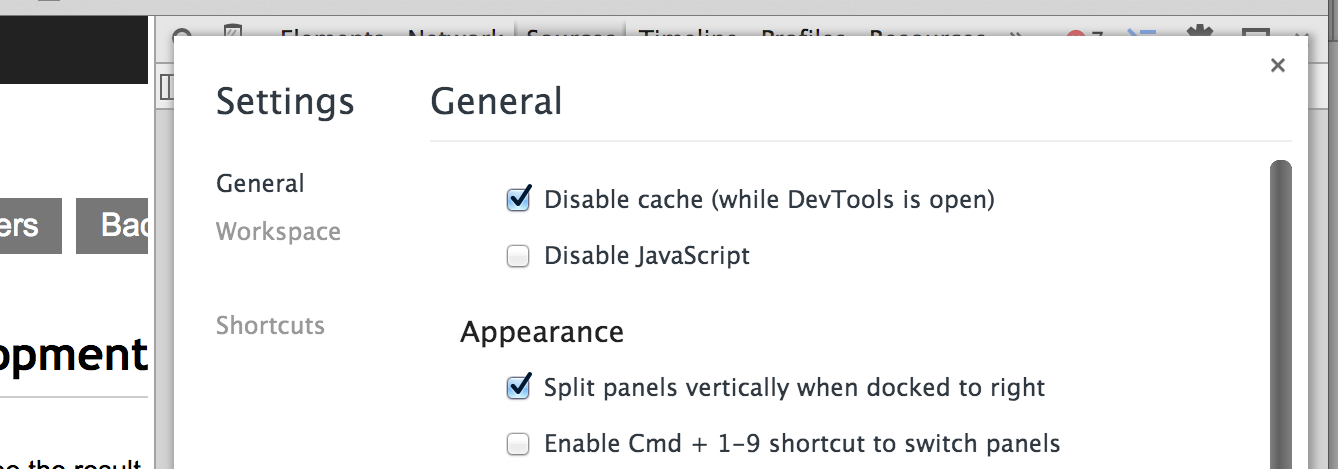
Disabling caching - Google Chrome


Note that disabling cache only applies when you have the dev tools open, so you don't have to worry about your normal web surfing with this setting.

Tip 5: Component changes might not need a full build
UNLESS you change the signature of a method (in blocks this can be a method or event signature, or a property), you will not need to reflect those changes in the designer, so there's no need to build the GWT part of the system.

When no changes to the designer are needed, you can use `ant comps`, which will not only compile exclusively changes to your component, but will also push a freshly baked App Inventor Companion app to your phone if you have it connected through USB.

Tip 6: Minimize permutations in GWT compilation
There are two ways of minimizing the number of compilations that GWT will run during a full build, one being restricting the number of browsers you build for, and the second being the number of languages you fully build. These changes can be made in the YaClient.gwt.xml file.

If you generally develop only using Chrome, or Safari, or Firefox, you can modify the GWT config file to avoid building for other browsers. In line 10 in the following gist, in the value for user.agent you can choose between 'safari' and 'gecko1_8'. If you generally only use firefox, you can delete everything before the comma (including the comma). If you generally use chrome or safari, keep the safari value and delete the comma and the gecko part. This will compile GWT only for the browser you have chosen.

Since we have introduced the internationalization code, the more languages we add, the longer it takes to build (more permutations of the code). In the gist again, if you comment out lines 104 to 109, both included, you will only build the interface in English.

You can combine languages and browser and go down to 2 permutations instead of 9, which will save several minutes from your build.

Tip 7: Do you really need that build server running all of the time?
This isn't really a compilation tip, but it might also save you time while developing.
Some people use a starting script that runs both the app engine server and the build server. Most of the time (note, not all of the time!) you will be making a bunch of changes and testing them on the companion if they are component changes, or in the browser if they are interface changes. You will only build an apk towards the end of the process (in component changes) before submitting a pull request. So you won't need to spin up the build server most of the time.

NOTE
As mentioned at the top of this post, please note that most of these tips are to be used only during development, BUT before you open a pull request, you should test fully, and with all languages and all browsers.

Happy (and hopefully shorter) building!


Thursday, July 24, 2014

Support for building apps on API Level 4 in App Inventor - Better Tablet Support

We've been working to take App Inventor out of screen compatibility mode, and that work has now been merged. This hasn't made it to a release yet, but it will soon. We will announce the changes in the forums when this happens.

What does it all mean though?
For starters, App Inventor will not support Android 1.5 (API level 3 - Cupcake) anymore, but we are compiling against Android 1.6 (API level 4 - Donut). We know there aren't a lot of devices out there still working at this level, but the change from level 3 to 4 was a rather large step to take, mainly because of the already mentioned screen compatibility mode.

Up to now, all App Inventor apps would be automatically scaled by the system to make them look the same in all devices, no matter their resolution or screen size. This sounds good, but the effect of this was that most elements would look rather awfully oversized on bigger screens such as tablets.  From now on, the resolution of the device will be used, and apps will look much better in larger screens with higher resolutions. As a drawback, the App Inventor designer will be a bit less in sync with what's actually being rendered on the device, but we've done our best to keep things as smooth as possible. If you find any issues with rendering in the designer please do get in touch with us through the forum.

What other changes have been made?
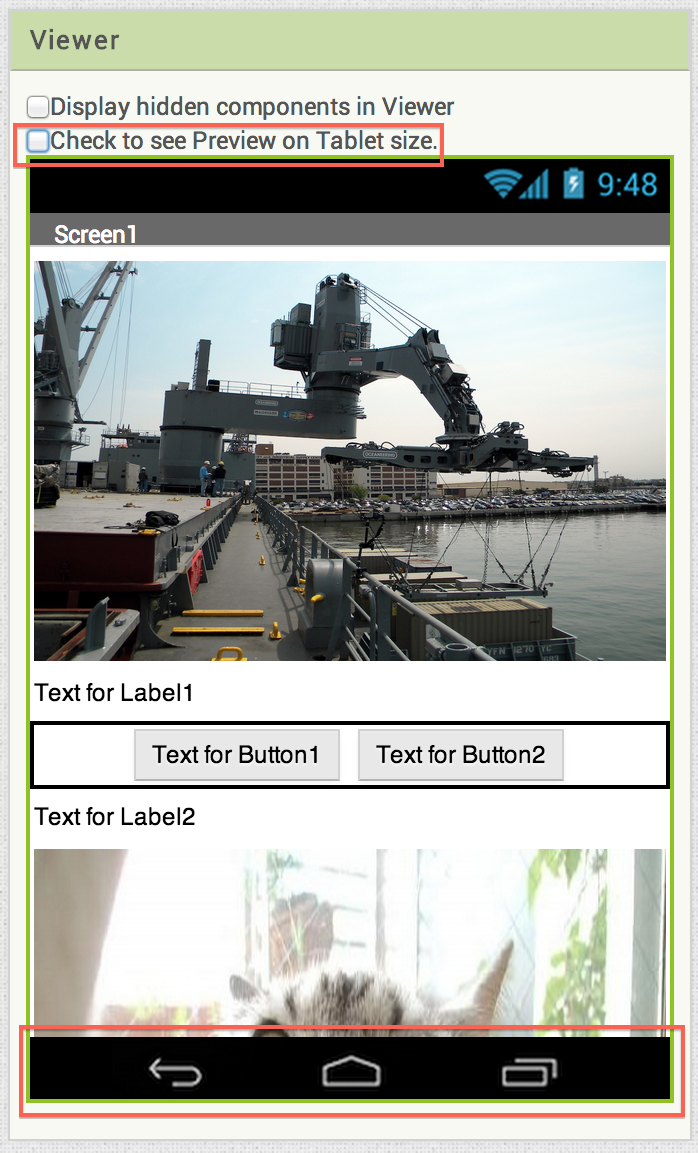
We have added a check to change from Tablet to Phone preview mode. It basically resizes the viewer so that you can see how the app looks at two different sizes. We are using Nexus sizes as generic here, Nexus4 for phone, and Nexus7 for tablet. As you can see in the screenshot below, we have also added the buttons bar found in most newer devices. The two changes are highlighted in red.


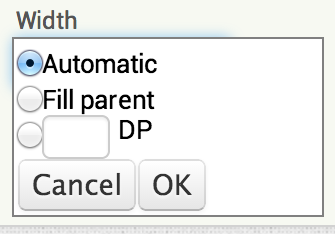
Another big change is that now all sizes for elements are density-independent pixels (DP) instead of hardcoded pixels. You will see a change in the Width and Height boxes in the designer.


The concept of DP is a little hard to grasp. Some people compare it to using percentages for sizes in HTML, but that's not quite correct. This is the definition used in the main Android docs:

Density-independent pixel (dp)

A virtual pixel unit that you should use when defining UI layout, to express layout dimensions or position in a density-independent way.
The density-independent pixel is equivalent to one physical pixel on a 160 dpi screen, which is the baseline density assumed by the system for a "medium" density screen. At runtime, the system transparently handles any scaling of the dp units, as necessary, based on the actual density of the screen in use. The conversion of dp units to screen pixels is simple:
px = dp * (dpi / 160). For example, on a 240 dpi screen, 1 dp equals 1.5 physical pixels. You should always use dp units when defining your application's UI, to ensure proper display of your UI on screens with different densities.

This DesignBytes video by Roman Nurik is a good source of information about the topic:


There is an additional property that has also been added to Images: scaleToFit; checking this box you can make an image fit completely the size of its enclosing area, for instance if you fill the parent in width or height, the image will fit the area (the image will not keep its aspect ratio, so be mindful when using this property).


So, with all these changes, what are the things to watch out for?
Some apps might be affected, especially those using hardcoded sizes in pixels. We have made many tests and the majority show very little differences, but there might still be some differences.
The other thing to watch out for is if you were using any tricks to grab the height and width of the screen to size your elements. Watch out for problems in there and please report whatever you find.

And what's next then? Well, this change opens a number of possibilities for App Inventor apps. We can start thinking about using a targetSDK level now, even providing a property in Screen1 to allow the user to choose which level that is. We could also start thinking about moving to API Level 8 (Froyo) as there are not many devices using a level lower than that. But probably the most important change here is that we can now start using support libraries and think about adding some of the most used design patterns in Android, such as Action Bar, navigation patterns, or even themes.

This is all a bit far ahead, but there's no technical reason stopping us now from working on changes like those. If you want to help with any of these projects, do get in touch through the open source forum. Great times ahead!

Friday, June 21, 2013

Open Source Development with App Inventor: Part 6 : Wrapping Up Series 1

Show all videos of this series.
Part 6 of Open Source Development with App Inventor will be the last video that I'm going to record for now. Most of the basics have been covered, so I have decided to take a break from videos, and probably go back to writing more focused posts. In any case, don't expect much from me until the end of the summer!
If you have any topics that you'd like me to cover, and think it's worth making a video of it, please leave a comment.

The last couple of hangouts have been focused on the part of App Inventor that, in my opinion, is the most technically interesting: how incremental development happens in the REPL, which for us can either mean the emulator, or a connected device (via USB or wifi). I know little about that part, so I guess that's why I find it so interesting. If you want to know more about incremental development, you cannot miss out watching the hangout in May, in which Jeff talks about it, and also about the rendezvous server used with the Companion app(wifi mode). The video is here:


For more information on how Java interoperation is achieved through Kawa, the June hangout should help:


There are a number of very important topics for App Inventor development, and I briefly cover some of them in the video. Please use the mailing list for discussion, ranging from ideas or improvements, to stickier topics such as what the primary audience for App Inventor is, should the focus shift towards other targets, and so on.
There's been a number of new distributions appearing (if you follow the forums, you can see the work Hossein, Gary, or Dave Wolber are doing). These are all great, but it would also be great if, as a community, we can talk about how to best approach things and design for interoperability. A couple of good examples in the forums are the threads about the sqlite component, and a discussion titled the dangers of fragmentation. Please keep active in the forums and irc.

The last subject in this video briefly covers how to work with App Inventor 2 (codename: newblocks) from the github account.

And finally, here's the video for Part 6:


Enjoy!

Saturday, June 15, 2013

Open Source Development with App Inventor: Part 5 : Your own Personal Companion

Show all videos of this series.
In this part of the video series we are going to see how to package our own Companion app. This is the app that can be used with wifi for development purposes (no USB cable needed).


As explained in the video, the reason why you would want to create your own app is that the Companion contains a copy of each of the Components available in the system. If you develop a new component, this new guys and its blocks will not be available in an app distributed by MIT. You can create your own app by using an ant target available in the main build script:

ant PlayApp

Make sure that you manually uninstall any other Companion apps before installing the newly created one, especially if you have installed an app distributed by MIT. The reason is that the apps, even though they can have the same name, are going to be signed with different keys, and the phone might get a bit confused.


If for any reason you need a Companion app for an older version of App Inventor, you can create one using the MIT repo git tags. One thing I forgot to mention in the video is that to update the tags from the repo, you have to fetch them. This can be done by executing (assuming you have called the remote 'upstream'):

git fetch upstream

These are the steps to move to a different commit (in this case we use a tag, but a commit would work too), and create the new-old Companion app:

0. make sure you are in clean state, in master, and with all the latest from upstream (mit-cml)
1. sync with upstream to grab all the tags: git fetch upstream
2. checkout the tag you want to build the companion for: git checkout v133
  - this will put you in detached head mode
3. ant clean; ant; ant PlayApp
 - this creates: MIT Companion app.apk
4. git co master to go back to master.

 And that is all for this video, catch you in the next one!

Saturday, June 8, 2013

Open Source Development with App Inventor: Part 4 : Android Activity Lifecycle

Show all videos of this series.
The training site for Android is full of great resources. If you have an interest in Android development, I would recommend to go through all of the sections, but if your time is limited and you can only go through a bunch of them, you should not skip Managing the Activity Lifecycle.

Always keep the following figure in mind when developing and app, and App Inventor provides hooks to the Activity Lifecycle through the Form class:

Activity Lifecycle, from Android training site.


The following video shows those hooks, and the main interfaces used to that effect:


In the next video we will be showing how to package the Companion app from sources, and explaining why you would want to do that in first place.

Wednesday, May 29, 2013

Open Source Development with App Inventor: Part 3 : Read the source Luke

Show all videos of this series.
Welcome to another video of the Open source development with App Inventor series. In part 3 we will go through the sources by reviewing how new Components are created. We will see some of the main parts of the Twitter component, and what parts of the system need changing to make sure that everything is kept in sync.

The image that opens the video was taken from Coding Horror, a fantastic blog about software development.


The main two documents used in this video are:

In the next video we will be talking a little bit about the Android lifecycle, how it affects App Inventor apps, and how the codebase hooks into the methods provided by the Android SDK. Catch you then!

Monday, May 20, 2013

Open Source Development with App Inventor: Part 2 : Working with the Sources and Git

Show all videos of this series.
In this part of the Open Source Developement with App Inventor series, we'll see how to work with the sources. My first (and only) attempt at recording it was getting too long, so I decided to divide this part in several videos (3 in total).

In the first video (titled Part 2), we'll see the documents that are the base of all the actions explained in the video. These are mainly two, How to build App Inventor from MIT sources, and Developing App Inventor with git and github. As mentioned in the video, if you just want to run App Inventor locally, and do not expect to be changing the sources at all, then the first document is enough. If you want to work a bit on the sources, make some changes, or create your own components, then you need to read both documents. And here is the first video:


In the second video (titled Part 2 and a Half), we see how to sync with the remote or upstream repository. Git is a distributed version control system. If you have worked with a system like subversion before, Git might be a bit difficult to grasp at the beginning. Here's a good comparison article between centralised and distributed source control. If you haven't gone through the Git resources highlighted in previous videos of this series, please do so now. In this video we will see how we can get our github Fork synchronised with the main repository maintained by the MIT team.


The third video (titled Part 2 and Three Quarters) shows how, once the sources have been built, the system can be locally launched. As explained in previous videos of this series, there are two main servers that you need to get running to play with App Inventor locally, one is the server portion of the appengine project that backs the Designer interface, and the other one is the Build Server that creates the apk files for your projects. Here's how you can do that:


Wednesday, May 8, 2013

Open Source Development with App Inventor: Part 1 : Developer Overview

Show all videos of this series.
In this second part of the video series we are going to explore the basics of the system, at a very high level. A description of the different projects and what they do is given.


The links for this part are:

Where to find stuff?
Main OSS Website: http://appinventor.mit.edu/appinventor-sources/
Forum: https://groups.google.com/forum/#!forum/app-inventor-open-source-dev
IRC Channel: freenode.net #appinventor

Other links:

Thursday, May 2, 2013

Open Source Development with App Inventor: Part 0

Show all videos of this series.
I am a big fan of tech video series. If I recall correctly, railscasts was the first one I watched, probably at about the same time that I started following TED talks (although the latter are not really a 'series' in itself, and not always about tech). Much more recently, I have very thoroughly enjoyed the AngularJS videos in egghead.io, and I tend to watch as many full conferences as I can.

No surprises here then if I tell you that I have started recording my own series, right? The topic is App Inventor and Open Source. I have no idea how often I'll get a chance to record a video, but if you want me to talk about an specific part of the project, I'll do my best to get it online. I will always try to keep them shorter than 10 minutes (that's the format I generally enjoy more), so some topics will be divided into multiple videos. I do not intend to do any editing, so at times, you'll see me doing some weird stuff and getting it all wrong, but I won't be cutting stuff off, mostly for the sake of learning. Feel free to shout to the screen (as I do... at times...) or leave a comment, and I'll do my best to get it right in another video.

I am going to start with the basics, but this isn't really a 'Learn Java' kind of series; there are millions of resources out there to learn Java and Android, so I doubt we need yet another one (and I also doubt I can do a better job!). So if you know a bit of Java (or some other language), and you are familiar with the command line, and building programs from it, you are all set for the series... so let's get started!

Part 0: Before you start


Here are the links in the video:

Where to find stuff?
Main OSS Website: http://appinventor.mit.edu/appinventor-sources/
Forum: https://groups.google.com/forum/#!forum/app-inventor-open-source-dev
IRC Channel: freenode.net #appinventor

Other links:
Article about the command line.
Github and CodeSchool interactive tutorial.

Wednesday, April 24, 2013

Long running tasks in App Inventor Components

(Many thanks to Mark Friedman from Google for his review and great comments).

As mentioned in the post about the UI thread, App Inventor is basically a UI centric system, in the sense that everything happens within a Screen. For this reason, when tasks that might take a bit of time to finish are required, they should be done in their own thread, or otherwise the full UI will come to a halt until the task finishes up.

Examples of long running tasks could be, among others, any operations that need access to external resources, such as the calls in the Web component, the calls to the Twitter API, calls to reading from the SD card, sending or retrieving data in TinyWebDB calls, and so on.

So how can these kind of operations be dealt with? Mainly by dividing the process into two stages, a first part that spins a new thread to deal with the operation itself, and a second part that can trigger an event back in the UI thread, once the operation is finished. This is the core idea behind Event-Driven Architectures or Event-Driven Programming, and most toolkits for creating graphical interfaces use it widely.

According to Wikipedia, Event-driven Programming can be defined as:
[...] an application architecture technique in which the application has a main loop which is clearly divided down to two sections:
  • the first is event selection (or event detection)
  • the second is event handling.
Let’s see it with a concrete example; Think about how the Web component in App Inventor works:
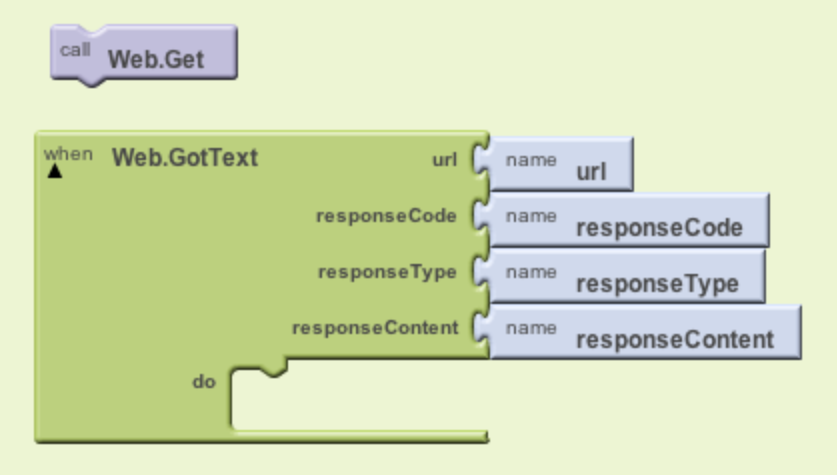
Part 1: Call Get : Part 2: when GotText gets triggered, handle it.

The user will place a Web.Get call block in a handler(such as a button click), and configure the component with the URL to be accessed. That is part 1 of our event-driven design. For part 2, the user needs to place a Web.GotText event block (or Web.GotFile) in the blocks editor, and they are assured that when this event is triggered, they can access the contents of the resource they had asked for (as well as the response code and type).

In programming terms, for a component developer, the Web.Get call block will have to create and launch a new thread to grab the resource that the user wants from the Internet. Once the resource is retrieved, this new thread will communicate back to the app by triggering the Web.GotText event in the UI thread. Let’s see this in code.

First part: running a new thread with the request
  @SimpleFunction
  public void Get() {
    [... some config code here ...]

    AsynchUtil.runAsynchronously(new Runnable() {
      @Override
      public void run() {
        try {
          performRequest(webProps, null, null);
        } [... exception handling code here ...]
      }
    });
  }

The main thing we want to observe here is that the call to performRequest is done inside a Runnable object, which will be a thread spawning from the UI thread. This is step 1 of our event-driven design. Whatever we need to do in this method, and however long it takes, is not a concern anymore (to a certain extent!) because it will be performed outside of the UI thread.

Second part: processing the request and going back to the UI thread
Lets see now what the performRequest method does, and how it connects back to the UI thread:

  private void performRequest(final CapturedProperties webProps, byte[] 
    postData, String postFile) throws IOException {

    // Open the connection.
    HttpURLConnection connection = openConnection(webProps);
    if (connection != null) {
      try {
        if (postData != null) {
          writePostData(connection, postData);
        } [... other code to write to file ...]   
        [... some more code to deal with the data; note that this code, and
             other actions such as opening a HTTP connection at the top of
             this method, can take a long time ...]
          // Dispatch the event.
          activity.runOnUiThread(new Runnable() {
            @Override
            public void run() {
              GotText(webProps.urlString, responseCode, responseType, path);
            }
          });
        [... more code to handle files instead of text responses ...]
      } finally {
        connection.disconnect();
      }
    }
  }

What is going on here? Well, a HTTP connection is opened against the resource on the web that the user wants to access. Depending on configuration, the user can decide to save the response to a file, or in the code that we can see here, just treat it as text. Once the data is read from the web, this thread’s job is done, and it can invoke the user’s event handling block, which runs in the UI thread. It will do so by triggering the GotText method inside a Runnable object, but as you can see, it is run through the activity.runOnUiThread method in order to switch back to the UI thread.
Note that operations such as opening a HTTP connection will take a while and will also block the thread until they are done. That concept of blocking the thread is exactly what we are trying to avoid in the UI thread, but we don’t mind if this other thread gets blocked for as long as it needs. This is the basis of Asynchronous programming as explained in the previous blog post, and we can take advantage of it to give our users a more pleasant experience while using our apps.

Wondering what that AsyncUtil.runAsynchronously method in the Get function is about? Well, these longer tasks are so frequent in App Inventor that there is some supporting code to accomplish them. The class AsyncUtil.java can be used to spawn new threads for the component code. This is the method used in the Web component:

  /**
   * Make an asynchronous call in a separate thread.
   * @param call a {@link Runnable} to run in the thread.
   */
  public static void runAsynchronously(final Runnable call) {
    Thread thread = new Thread(call);
    thread.start();
  }

It’s very simple code; you pass in a Runnable object, and the method creates a thread and starts it. This is the basic threading mechanism in Java. For more information have a look at the Concurrency tutorial.


There are many other examples in the App Inventor sources showing this kind of event-driven approach to longer operations. When you are creating a component, think that any operation that needs to access resources such as the network or external storage, will need to be designed in this way. You might think that, for instance, if you only read small files from storage, then you will be fine doing it in the UI thread. You might even try it, and test it for a bit, and convince yourself that it works fine, but believe me, it will not cut it in the real world. Think about users with slower and older devices, or slow connections to the Internet, or simply think of a device that, at a particular time, might be busy doing some other operation such as upgrading a different app. You really want to get your design correct and functional for all your users out there!

Tuesday, February 19, 2013

A Single Thread of Execution in App Inventor Screens

The development documentation provides a very good example of why certain things in the User Interface (UI) of an app happen in the way they do. In App Inventor we use Screens to lay out components to create the UI of the app.

The main idea is that all actions that affect the UI happen sequentially. Some examples of these kind of actions could be changing the text of a label, or handling users interacting with the app via a button or a text box.

Sequential execution in App Inventor means that different blocks can never interrupt each other.

Different blocks and handlers will always be executed in sequence. Once a block starts executing, it will execute till the end, no matter if there are other blocks reacting to the one in progress, or users pressing buttons in the app. On more technical terms, we say that everything in the UI is executed in one Thread, the UI Thread, which is responsible for all updates and interaction that happen in each Screen of your app. For this to happen, we need some kind of mechanism to keep track of what needs to be done next, and when something should be done. A very simple model would be a Queue, just like the one you join at the supermarket to pay for your shopping. Tasks can be added to a Queue in the same way that people join in the queue from the end of it.

With all this in mind, let's see the example in the documentation. (From How to add a component )

This gives a simple execution model for users: An App Inventor procedure will never be interrupted by an event handler, or vice versa; nor will one event handler be interrupted by another. This is illustrated in Figure 1:” (Ellen Spertus)

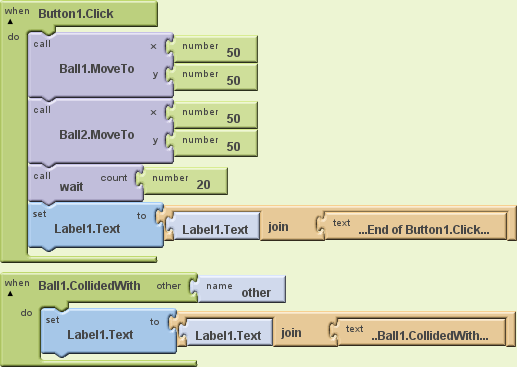
Figure 1: Sample program demonstrating serial semantics.
The example uses two Ball components, one CollidedWith handler that should fire as soon as Ball1 collides with anything, and an extra procedure called wait, which we don't really see what it does, but we are going to suppose that it takes 20 seconds to execute (imagine that it is loading content from the internet and it takes that long). All the code, except for the collision handler, is contained within a Click handler.
When Button1 is clicked, the two balls are positioned in exactly the same place, first Ball1, and then Ball2. Positioning the second ball in the same place as Ball1 should trigger the collision handler for Ball1. Some users would expect this to happen straight away, but if you were to execute this code, you would see that the collide handler will not execute until the click block finishes, and this would take at least 20 seconds because of the call to wait.

Following the same idea as above, you can think about the UI thread as if it was a Queue to get into the cinema; on arrival, ticket buyers will position themselves at the end of the queue.
When Button1 is clicked, we add the following things to the Queue:
  • position Ball1
  • position Ball2
  • wait
  • set Label1 text to : '...End of Button1.click...'

When Ball2 is positioned, the CollideWith handler is added to the Queue, but it cannot be executed straight away because the UI thread still has some tasks to do. So, after a couple of seconds we will see a queue such as:
  • position Ball1 (DONE)
  • position Ball2 (DONE)
  • wait (IN PROGRESS)
  • set Label1 to: '… End of Button1.click ...' (TO DO)
  • CollidedWith (added to the queue when the collision happens)
    • set Label1 text to: '… Ball1.CollidedWith ...' (TO DO)

So Ball2 makes the handle trigger, but that does not mean that it will be executed straight away, instead it means that it will be added to the queue in the UI thread.

In the end, Label1 will always be assigned the value '...End of Button1.click...' first, and the value '...Ball1.CollidedWith...' later.
When both blocks finish, it will always read: “...End of Button1.Click......Ball1.CollidedWith...”.

Please note that having a procedure like wait blocking the UI is a really bad idea in an app, because as we saw in the explanation above, the app will be unresponsive for those 20 seconds, and this is not a pleasant experience for the users. If your app needs to do some expensive processing, it is quite possible that this interaction will block the app for as long as it takes.

From a design and development point of view, it is also important to note that certain blocks in App Inventor were designed with the UI thread in mind, and broken down into two different stages. For instance, the Web component Get call could be considered part 1 of a call to a web resource. This call will not block the UI because it is not performed in the UI Thread. When the response from the Get call is received, then part 2 will execute, which would be the event GotText (or GotFile, depending on how Get was configured). If you are planning on developing a new component for App Inventor, you need to take this into account.

Also related to this idea of sequential execution, a lot of users ask why their timers do not fire on time, for instance exactly every 2 seconds. Actually the timers fire at the time they are supposed to, but this only means that their handlers get added to the scheduling queue for UI updates. If at that particular moment something else is executing in the Screen, then the actions fired by the timer will have to wait for those other actions to finish, before they can be triggered. But once they get next to be executed in the Queue, they will fire one after the other, not waiting for any intervals. The waiting was already done before joining the Queue. 

This is actually something very usual in UI libraries, from Java (Swing) to Android, and even JavaScript. The browser, in which JavaScript executes, also has a single thread of execution, generally called the event loop, and it will behave in the same way as App Inventor does. Same happens if you run JavaScript on the server through something like node.js.

This is all a simplification of what really happens, and Android can create other Threads of execution that do not conflict with the UI thread to carry on with other operations. For a deeper dig in the matter, follow the link in the Android documentation to the Painless Threading article.

Thursday, March 8, 2012

A read-only API for P2PU

I've been part of the P2PU community for a good while now, and have organised a couple of groups within their platform so I thought it was about time to give back. On top of that, they use Python and Django, two pieces of technology that up to a month ago or so were completely unknown to me and I have always wanted to learn. Not that  I know all that much about them right now, but there's nothing better for learning than using the tools in a real context and within a real project, so that is exactly what I've been doing for the last couple of weeks. #opensource_ftw!

After an initial proof of concept using tastypie, as recommended by the chaps in the python.ie mailing list, I have started to work on it a bit more seriously and it will hopefully soon enough be reviewed and merged with the main Lernanta codebase. My fork of Lernanta has an API branch where you can find all the code to date.


And you might be wondering... why am I telling you all this? Because I could do with some help! If you want to learn not only Python and Django but aslo about RESTful architecture and web services do not hesitate in joining me.

Illustration by @alisonjeancole


You can also have a look at the blog post in the main P2PU blog.

Thursday, January 19, 2012

Open Wonderland - Best View proposed changes

Best View is about the most useful capability ever! It works great with objects with an aspect ratio very similar to your screen, but it's not as good with wider objects such as a cardwall.

You can see what I mean in the following video:


So scratching an itch, I've been working on a patch to add functionality to the capability so that you can focus on certain parts of the object. The key modifiers I'm proposing are:

Mouse wheel = zoom in and out
alt + Mouse wheel = move left and right
alt + crtl + Mouse wheel = move up and down

UPDATE
The keys to be used now are:

Mouse wheel = zoom in and out
ctrl + Mouse wheel = move left and right
ctrl + shift + Mouse wheel = move up and down


The mouse wheel effect also works with trackpads and Mac mouse devices by just sliding a finger as if you had a real wheel.

The patch has not been reviewed yet but if you want to give it a go, I have sent it to the mailing list, and I would appreciate any testing and feedback. Just take into account that it might be rejected.

Wednesday, January 11, 2012

New Year, New Wonderland Project

Another year begins and so does another Wonderland Wednesday Project. This time we have decided to improve the telepointer module that is already part of the wonderland-modules project.

The current telepointer has a bit of a weird shape and it's a 3D object. I personally cannot think of the benefits of a 3D pointer as compared to a 2D one… sounds the same to me!
The user name renders on top of the pointer in billboard mode, and that makes parts of the word disappear depending on the surface that the pointer is held against. So the first 2 tasks we will go for first are to change the appearance to a more regular 2D shape, and more importantly, to make it work when you take control of a 2D app.

This module is a good example of a Wonderland Component or Capability. In this case, instead of being available to attach to any object in world, it is programmatically attached to all avatars through a server plugin. A nice example if you want to see how to do such a thing.

We will be working on this again on Wednesday the 18th of January so feel free to pop along to the community server at 1p.m. EST or 6p.m. here in Dublin.

Sunday, November 20, 2011

Open Wonderland and Google Docs Proof of Concept

I have been very quiet for the last while but as my work load eases out I've had some time to mess about with Open Wonderland again.

This time I've spent a couple of hours putting together a proof of concept (POC) to send information to Google Docs from inworld. In the following video you can see how a word processor document is created from an in world HUD.


The module is very rough and has only been thought of as a proof but if you want to check it out feel free to do so. As usual my code is in github: Proof of Concept for Google Docs and Open Wonderland Integration.

I have to say that the Google Data API has its quirks, although I have only spent a couple of hours using it, but it seems to be solid enough to create powerful client applications.

Any feedback is very welcome as usual!

Tuesday, August 16, 2011

the summer of busy

So far this summer is being much busier than usual.

A couple of weeks ago I attended the html 5 hack-a-thon organised by the Dublin GTUG guys. It was real fun and got to meet some very interesting people and to hack on a browser multi-user whiteboard based on WebSockets and canvas. All the projects were really good, and the effort during the two days paid off big time.

Last week we were busy working on a rails mountable engine to add feedback forms to your web during the Ruby Project nights at amworks. Only a few hours there but it's great to be able to learn and share socially out of work hours, at least from time to time!

In the meantime all is good to go for the code retreat we are organising for September the 17th. Location and sponsorship is pretty much all we needed, and we are looking forward to the day. Tickets flew in less than 3 days, so hopefully people will turn up on the day. If you are reading this, have a ticket, and know for sure that you cannot attend, please let us know cause we have a growing waiting list.

And finally, all is ready for the dublinjs meet up tonight in which Wiktor will tell us all about CoffeScript and Dom has prepared a Kata for us to go through. Great fun ahead!!!

Thursday, August 4, 2011

Open Wonderland OurBricks module Preview 2

Another update on the OurBricks module to use within Open Wonderland. This time you can see the process end to end.


There are still a few glitches in the UI, not being very responsive, and the OurBricks API is likely to change in the near future as it is in active development, but the prototype is working now, as you can see in the video.

If you want to play with the sources you can find them in my github account.

Tuesday, August 2, 2011

Open Wonderland OurBricks module Preview

I've been working for the last couple of weeks in a new module that will eventually allow the loading of 3D models from the OurBricks collection directly from within Open Wonderland.

The module is in a very early stage and we are collaborating with the guys at OurBricks to get it finalised as soon as possible, but for now you can see the progress (search functionality) in the following video:


As usual, you can find the source code in my github account. Feel free to clone and change. Pull requests always welcome!

Update: Just got a couple of models imported; a bike and an aircraft, as can be seen in the following screenshot:

Models from OurBricks.com

Thursday, July 28, 2011

Hackerspace and Formal education discussion at Dublin GTUG

After some great responses to the hackerspace and formal education discussion at the monthly Dublin GTUG meet up I would like to make a few comments on the topic.

I don't want to be controversial but I do have to be a bit critical of the event for the very reason Seán mentions: A panel in which 4 out of 5 participants (plus the host) are clearly on one side, and the reamining participant doesn't take sides, can not generate much discussion. On top of that, if you frame it within a local group meetup, where at least a 90% of the people are also going to be on the hackerspace side... well, what can I say?

And don't get me wrong, I really enjoyed the session and I think some very good points were brought up but it would be very interesting to hear some arguments from the other side. Not only from an academic point of view, but running a hackerspace within a college (as it seems to be one of the suggestions) carries a lot of administrative issues such as access to the space, who pays for stuff and how that affects group dynamics (seems like at least the Dublin hackerspace guys prefer to stay away from external funding), who is responsible and liable in the case of anything bad happening, and so on. There are a bunch of issues that we missed out on because there was no one there to expose them.

A point that was fairly commented on was assessment, which is (in my opinion) the hardest topic in education, and (again in my opinion) the one that should be the focus of all potential integration of hackerspaces and formal education.
I am all for innovative and creative educational experiences but SADLY students are still evaluated in isolation and in an environment where collaboration is considered cheating.
This needs changing but hackerspaces only provide for the first part of the equation and assessment is not even an issue. Or is it?
I'd say that there is always assessment in all kind of social interactions. You are obviously not going to be awarded a degree in your hackerspace but there are other kinds of peer review and recognition patterns going on. More active members will become part of the organisation, running courses and leading events, or getting praise and recognition for the pieces they hack together. That peer recognition is obviously enough to motivate involvement with the community so could we use that as a basis for more formal assessment? I would like to hear the thoughts of academics on this (although I might not like what I hear back!).

The panel mentioned ditching standardised tests in favour of a viva after 4 years undergrad, bringing the post-graduate model into undergrad. I'd be happy with that too.

I would also like to comment on a couple of points about formal education that I felt (personal opinion) that were not all that fair. We've all seen Sir Ken Robinson's TED talks and RSA video many times and know that education is rotten but universities can also be places for innovation and fun stuff; you can see it around any postgrad lab where people are given the freedom to work on what they are more interested in. It was mentioned that students coming from a hackerspace background can do really creative projects so it is unfair to say that that does not happen.

Another comment from the host I would like to point out is that he mentioned his disappointment after entering a university classroom not long ago and seeing a waterfall model in a whiteboard (or a similar situation).
I'd say there is nothing wrong with studying waterfall this day and age. The real problem would be if the topic ended there and no other alternatives were discussed. I bring up this because I think in our field (talking about software development) we don't pay enough attention to the past and we are therefore bound to repeat the same mistakes. This is why classic books such as The Mythical Man-Month or The Psychology of Computer Programming remain very much current, even though they were written many years before about half of the audience at the discussion where even born!

Another fair point made by the panel was the big gap between education and the workplace, which funnily enough is my research topic. I still don't have a solution for that, but as soon as I get it sorted you'll be the first ones to know... yeah, that's supposed to be a joke. A bad one. I know.

So as Seán mentions there are a lot of unaswered questions and I would like to bring up another one here: If we are all in the hackerspace side... why are we all still getting degrees?

All panellist have degrees, are working towards one (or more), or expecting to get enough points to get into one.
John Looney mentioned that Google hires people with no degrees (about a 10% of current staff if I heard correctly?) so why are we still going through the pain of getting one?
(Lecturer) Mark described the process as something like yearly semaphores that are used to sort people into groups and keep them entertained for a while. Is the social pressure worth all that pain?

It was very funny to hear one of the guys from 091 Labs in Galway commenting on the Irish mums effect, that can affect how courses can be considered good or bad.
And talking about mums, wouldn't it be nice that instead of being proud of their kid's degrees they'd be proud of their kids spending all evenings at the local hackerspace? Can we make that happen?


As a personal note, I would like to add that I completely disagree with the comments about free education filling up lecture theatres with people that somehow do not deserve being there.
I would hope we could focus on challenging those fake social needs that equate having a degree with being 'someone'. In that case only people with a real interest would go to college, regardless of their parents (or themselves) having the money (or not) to pay for fees.


Utopian? yes, and almost as unachievable as  teaching kids IT skills (Coder Dojocomputer club house, Camara), getting people to build stuff (TOG091labs NexusMilklabs), or creating great software and communities through volunteer work (Apache Foundation, GNU OS, P2PUOpen Wonderland).

Monday, July 18, 2011

Dublin JavaScript Group July meet up -- Kata Reloaded!

We are organising another Kata session for the Dublin Javascript meetup this month, which will happen tomorrow Tuesday the 19th at 6.30pm @amworks. You can sign up here.

These are my slides for the event, which are pretty much the same as the ones I used last month.


The initial idea was to have a presentation on Processing.sj although that has been postponed, but I'm sure Nigel will come up with something. And in any case we are going ahead with uncle Bob's Prime Factors Kata.

The solution, in the form of a powerpoint document, can be found here so you don't really have to worry about the solution itself and can focus on practising the Kata instead.
A couple of interesting points I've noticed after practising it a couple of times are the differences between his Java implementation and a JavaScript one, and my mixed feelings to his last refactoring, which I find a bit contrived. I prefer to stop at the level of 'while' structures because I believe it preserves the intent of the algorithm a lot more than if you go the whole way and replace them with 'for' structures. The result has more lines of code but in my head it's clearer. But as usual, this is a personal preference and everyone will have their own, which is a good thing!

The format for this part of the meetup will be the following:
I will go through the slides, which will take me about 3 minutes. Then we will set about 20 minutes for people to work on the Kata. Working in pairs using ping pong pairing would be highly recommended. The idea is that one person writes the first test, the other person makes that test pass and writes the following test, and this goes on until the Kata is solved. If you don't want to pair, that is fine. If you don't want to program at all, that is fine too!
During those 20 minutes I'll be available to help out, especially to any new faces that are not familiar with the concept of a Kata or with Jasmine. At then end of this period we will project one solution and have a short retrospective about it.

And that is all, please feel free to join us from 6.30pm at amworks. See you there!